Designing your Dream Products - word about Guide Lines
Dream Album templates come with design guidelines to help you create the perfect product. If you have not read our tips / instructions about cover design, please click on the following two links, or anything in our TUTORIAL categories.
Dream Box Cover Design instruction
Dream Album Cover Design Instruction - Which Guide Lines Go Where?
We would like to mention a few things to keep the design process running smoothly – for both you and us.
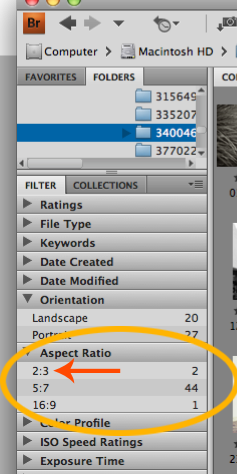
1. UPLOAD ALL files in 5x7 ratio to be BORDERED ( for border option 1~5 and no border). We border your images by batch process. If there are any 4x6 or 8x10 images among the files, they will be distorted. The easiest way to check correct ratios is within your folder in Bridge. (please refer to the screen shots on your left)
Please crop all your images to be 5x7, unless you choose the FULL BLEED design option. This applies to ALL dream album products including 5x7 dream mats, 8x10 dream mats, 6x6-9x9-12x12 dream albums.
2. Make "the folder name" easily identifiable as your order. The folder you upload to our server must contain YOUR NAME for the quickest processing. This applies to all product orders. If you are ordering the same products for multiple sessions, you may also want to add your client's name.
For example, if the photographer Katy Smith is ordering the 9x9 Dream Album with 40 pages for her client Jones on 11/18, the folder name should be: Katy_Smith_DA0909_40p_Jones_1118
3. Please USE the most UPDATED templates and guidelines. If you have not downloaded our NEWEST templates released November 2009, please make sure you do so now. Outdated templates or ignored guidelines may result in off-centered covers or production delays. You must use Dream Album templates with the center guideline for best results. Please note: photographers are responsible for all design errors.
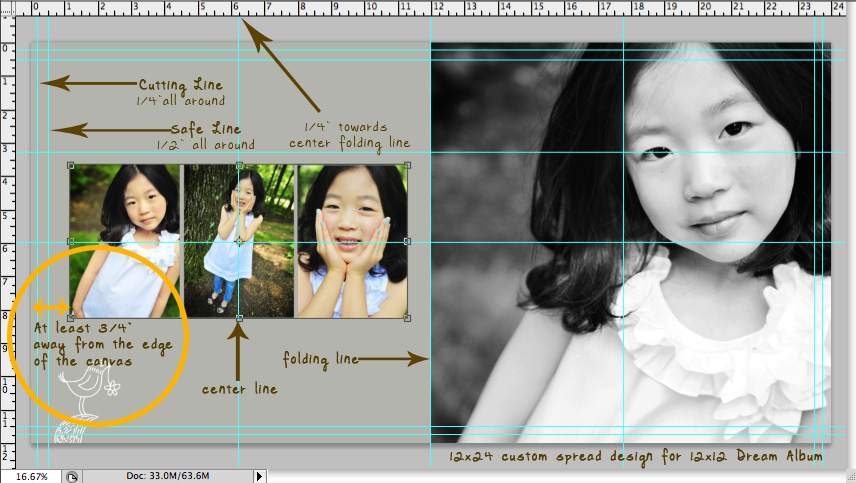
4. Guidelines for spread designs:
We cut THREE sides (top, bottom, and sides) of the album right before we apply the cover to the inside album pages. Our spread is a single sheet of paper and there is NO cutting line at all in the center of the book.
- cutting lines: 1/4" all around
- safe lines: 1/2" all around
But to center a block of images within a PAGE (12x12 or 9x9 square format), you must use 1/4" moved towards CENTER FOLDING line so that when all 1/4" around cut, the images will look centered. When you want any background section to shown nicely, make sure there is at least 3/4" gap between the edge of the canvas and the edge of the image mask.
If you are using album templates that are not designed exclusively for Dream Album Products, it is strongly recommended to check all your files to meet our guide lines. Please make sure layout BEFORE you upload the files. Dream Album will not be responsible for any design mistake by using templates not exclusively made for Dream Products.
 Post a Comment
Reader Comments